
Working with dependency injection is one complex concept in android dependency injection. Because Dagger-2 had complicated the concept for me when I came into android.
In this tutorial, I have explained another dependency injection framework that I recently adopted and how it has really simplified the process for me. That is Koin.
A pragmatic lightweight dependency injection framework for Kotlin developers. Written in pure Kotlin using functional resolution only: no proxy, no code generation, no reflection!
Office Website — https://insert-koin.io/
To learn more about kotlin, Please check
Kotlin Coroutines for Android Development
Kotlin Scope Functions Explained [Example]
Why / How Koin Works?
Koin is easy, simple & well-documented. It is perfect for encapsulated feature/library modules.
The koin works on a simple DSL model. Here we have to create a module first. In this module all the dependent objects are there, then we have to load one or more modules in koin. Then, we are ready to use this object. Generally, we are loading the module into koin in the application class by calling the start on method, then we can inject the object wherever we want, this is how the Koin works.
With Koin, setting up dependency injection is kind of a manual process, you essentially plug your services into the module graphs and those dependencies will later get resolved at runtime.
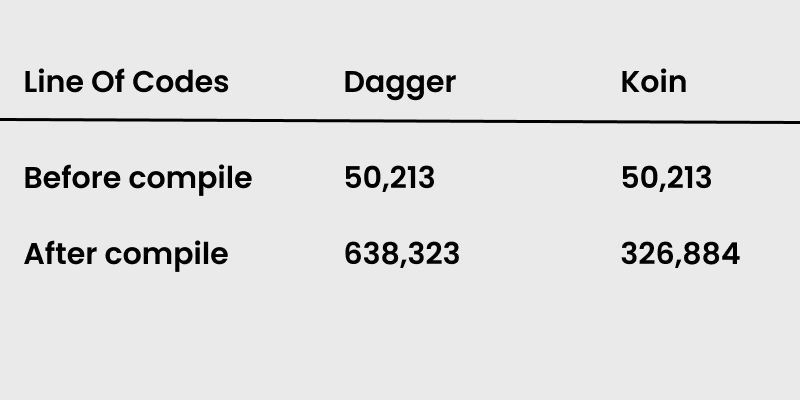
Lines of code
Here are the key functions.
get() — is used inside constructors to resolve needed instances. I advise using named parameters to achieve a better definition & improve readability.
factory— is used to indicate that a new instance must be created each time it is injected.
single — indicates that a unique instance will be created at the beginning and shared on every future injection.
repositoryModule – contains examples of binding interfaces (domain’s repo interface with its actual implementation) you can read more here.
name — is used to name definitions. This is required when you want to have multiple instances of the same class with different types.
bind — additional Kotlin type binding for a given bean definition
getProperty() — resolve a property
module { } — create a Koin Module or a submodule (inside a module)
viewModel { } — definition and this enables you to define a viewModel dependency.
Scope – Koin’s scope allows you to define locally scoped dependencies that are short-lived, like a Presenter, View Adapter, or other service components that are meant to be short-lived within a defined scope, like an Activity’s scope.
Koin Android Example
1. Add Dependencies
Add dependencies to the app build.gradle file.
implementation 'org.koin:koin-android:1.0.2'
    implementation 'org.koin:koin-android-viewmodel:1.0.2'
    implementation 'org.koin:koin-androidx-scope:1.0.2'
2. create a network module
create a retrofit instance
private fun httpInterceptor() = HttpLoggingInterceptor().apply {
        level = HttpLoggingInterceptor.Level.BODY
    }

    private fun basicOkHttpClient() = OkHttpClient.Builder().addInterceptor(httpInterceptor()).build()

    fun createBasicAuthService(): BasicApiService {
        val retrofit = Retrofit.Builder()
                .addCallAdapterFactory(RxJava2CallAdapterFactory.create())
                .addConverterFactory(GsonConverterFactory.create()).client(basicOkHttpClient())
                .baseUrl("BASE_URL")
                .build()
        return retrofit.create(BasicApiService::class.java);
    }
Tips:
To learn more about Retrofit please check this.
Retrofit android example kotlin[step by step] – Howtodoandroid
create network module
networkModule = module {
        single { createBasicAuthService() }
        single { RxSingleSchedulers.DEFAULT }
    }
3. create a ViewModel module
create ViewModel
class MainViewModel(val apiService: BasicApiService, val schedulers: RxSingleSchedulers) : ViewModel() {

        val userList = MutableLiveData<List<Users>>()
        fun fetchUsers() {
            apiService.getAllUsers().subscribeOn(Schedulers.io())
                    .compose(schedulers.applySchedulers())
                    .subscribe({ result -> userList.postValue(result) },
                            { throwable ->

                            })
        }
    }
Create ViewModel module
viewModelModule = module {
        viewModel {
            MainViewModel(get(), get())
        }
    }
4. Start Koin
start koin with list of network modules and viewmodel that we created earlier.
startKoin(this, listOf(networkModule, viewModelModule))5. inject the ViewModel dependency
Class MainActivity : AppCompatActivity() {
        lateinit var userAdapter: UserAdapter
        val mainViewModel: MainViewModel by viewModel()
        override fun onCreate(savedInstanceState: Bundle?) {
            super.onCreate(savedInstanceState)
            setContentView(R.layout.activity_main)
            userAdapter = UserAdapter()
            recyclerview.adapter = userAdapter
            mainViewModel.userList.observe(this, Observer {
                it?.let {
                    userAdapter.setItems(it)
                }
            })
            mainViewModel.fetchUsers()
        }
    }
Read More,
Beginning Android Development with Kotlin – Howtodoandroid
Example Code Available on Github
Leave a Reply