ConstraintLayout allows you to create large and complex layouts with a flat view hierarchy (no nested view groups). It’s similar to RelativeLayout in that all views are layered out according to relationships between sibling views and the parent layout, but it’s more flexible than RelativeLayout and easier to use with Android Studio’s Layout Editor.
The ConstraintLayout is also compatible right down to API level 9.
Before going deeper, check out my other post on the jetpack.
View Binding in Android Jetpack [Updated]
Getting started with WorkManager [Example]
MVVM With Retrofit and Recyclerview in Kotlin [Example]
Setting up the contraintlayout
- To begin with, download Updated Android from here.
- You’ll also need to add the dependency for the ConstraintLayout from the support library.
implementation 'com.android.support.constraint:constraint-layout:1.0.2'Constraints
A constraint defines a relationship between two widgets in the layout and controls how those widgets will be positioned within the layout. The aim of the ConstraintLayout is to help reduce the number of nested views, which will improve the performance of our layout files.
For Example, I have created EditText with Constraints.
<EditText
            android:id="@+id/editText"
            android:layout_width="wrap_content"
            android:layout_height="wrap_content"
            android:inputType="textPersonName"
            app:layout_constraintBottom_toBottomOf="parent"
            app:layout_constraintEnd_toEndOf="parent"
            app:layout_constraintStart_toStartOf="parent"
            app:layout_constraintTop_toTopOf="parent" />
ConstraintLayout features several more attributes:
constraintTop_toTopOf— Align the top of the desired view to the top of another.layout_constraintTop_toBottomOf— Align the top of the desired view to the bottom of another.layout_constraintBottom_toTopOf— Align the bottom of the desired view to the top of another.layout_constraintBottom_toBottomOf— Align the bottom of the desired view to the bottom of another.layout_constraintLeft_toTopOf— Align the left of the desired view to the top of another.layout_constraintLeft_toBottomOf— Align the left of the desired view to the bottom of another.layout_constraintLeft_toLeftOf— Align the left of the desired view to the left of another.layout_constraintLeft_toRightOf— Align the left of the desired view to the right of another.layout_constraintRight_toTopOf— Align the right of the desired view to the top of another.layout_constraintRight_toBottomOf— Align the right of the desired view to the bottom of another.layout_constraintRight_toLeftOf— Align the right of the desired view to the left of another.layout_constraintRight_toRightOf— Align the right of the desired view to the right of another.- If desired, attributes supporting the start and end are also available in place of left and right alignment.
Chains
What are chains?
Chains are a specific kind of constraint which allows us to share space between the views within the chain and control how the available space is divided between them. The closest analog with traditional Android layouts is weighted in Linear Layout but chains do far more than that, as we shall see.
Creating a chain
There are three possible modes: spread, spread_inside, and packed.
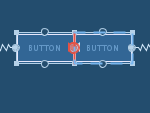
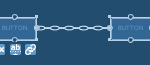
Packed Chain
The final mode is which packed will pack the views together (although you can provide margins to separate them slightly), and then centers the group within the available space.
Spread Chain
The default mode is spread mode, and this will position the views in the chain at even intervals within the available space.

The next mode is spread_inside which snaps the outermost views in the chain to the outer edges and then positions the remaining views in the chain at equal intervals within the available space.
Guidelines
A guideline is a visual guide that will not be seen at runtime that is used to align other views. Guidelines can be oriented either horizontally or vertically.
Creating a Guideline
To create a vertical guideline you do so by right-clicking on the blueprint view and selecting Add Vertical Guideline in the context menu.
Using guidelines
Dimensions
Sometimes we need to create views that have a fixed aspect ratio. This is particularly useful with ImageView we need to display images that come from a feed, and we know that any images we get will be a specific aspect ratio.
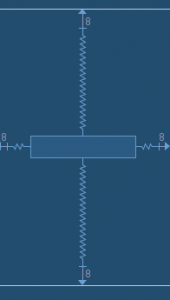
This allows us to position a view along the vertical axis using a bias value, this will be relative to its constrained position.
the attribute in our XML like,
app:layout_constraintVertical_bias="0.5"This allows us to position a view along the horizontal axis using a bias value, this will be relative to its constrained position.
the attribute in our XML like,
app:layout_constraintHorizontal_bias="0.5"The baseline constraint allows us to align the baseline of multiple text views, regardless of their text sizes.
A baseline contains handles that can only be constrained to another baseline.
Auto-connect allows you to place a view inside the layout editor and have it automatically calculate and set the constraints for you.
Delete Constraints
To delete the single constraint, switch to the design view and click on the particular constraint you want to delete as shown below,
Delete All Constraints
To delete all the constraints, switch to the design view and select the delete all constraints button on the design preview.
Thanks for reading. you can also download my constraint layout example in GITHUB.
Leave a Reply